- Published on
Scoping Search Results with Page Hard Filters in Sitecore Search
- Authors

- Name
- Francisco Caicedo Narvaez
- @_Francisco_CN
Scoping Search Results with Page Hard Filters in Sitecore Search
Not every search box on your website should search everything. A /news page for Brisbane should show Brisbane news. A /blog/technology page should show technology related content. Sounds obvious, but wiring that up cleanly, without messy front-end workarounds, is where Sitecore Search's Page Hard Filters come in.
This post walks through a concrete example: making the /news page automatically scope every search result to content tagged Brisbane. No visitor can break out of that scope, no developer needs to pass filter parameters in code, and no author needs to think about it once it's set up.
I'll cover attribute setup, page creation, and widget association, with clear callouts for what's a developer task versus what an author or content manager can handle themselves.
Overview
How Sitecore Search thinks about pages
Sitecore Search organises search experiences around two core concepts:
Pages are configurations tied to a specific URL (or URL pattern) on your site. Think of a Page as the "rule set" for a URL, it tells Search what content to show and how to behave when someone visits that address.
Widgets are the actual search components (search results lists, preview dropdowns, recommendations) that sit inside a page and drive what the visitor sees.
A Page can carry a Hard Filter — a fixed, behind-the-scenes constraint that permanently limits the pool of content any widget on that page can return. Visitors never see it, they can't remove it, and it fires before any ranking rules, facet calculations, or user-driven filters are applied.
For authors: Think of a Hard Filter like telling the search engine "this page is only allowed to talk about Brisbane." No matter what a visitor types, they'll only ever get Brisbane results.
For developers: The filter is enforced server-side by the Search API before any response is built. Your front-end component doesn't need to pass filter parameters — the page context (URL) is enough for the SDK to pick up the constraint automatically.
The scenario
Our site has a /news page. The content index contains news articles from multiple cities, each tagged via a page_tags attribute. The goal: /news should only ever surface articles where page_tags = Brisbane.
How the pieces fit together
Visitor lands on /news
        │
        ▼
Sitecore Search matches URL → "Brisbane News" Page config
        │
        ├── Hard Filter applied first: page_tags = "Brisbane"
        │         (permanent, invisible, server-side)
        │
        ▼
Search Results Widget runs
        │
        └── Returns only Brisbane-tagged documents
              (ranking, facets and user filters all work within this boundary)
Part 1: Preparing the page_tags Attribute
Who does this: A developer or Sitecore Search administrator. This is a one-time setup per attribute — once done, authors can reuse the same attribute on any number of pages.
Before page_tags can be used as a hard filter, it needs the right capabilities switched on in the Customer Engagement Console (CEC). If the attribute already exists in your domain, you're just checking and enabling a few flags. If it doesn't exist yet, you'll create it from scratch first.
Step 1 — Open the Attributes list
In the CEC, go to Administration → Domain Settings → Attributes.
Use the search bar to find page_tags. If it doesn't appear, you'll need to create it — click Add Attribute and give it an attribute name of page_tags and a suitable display name before continuing with the steps below.
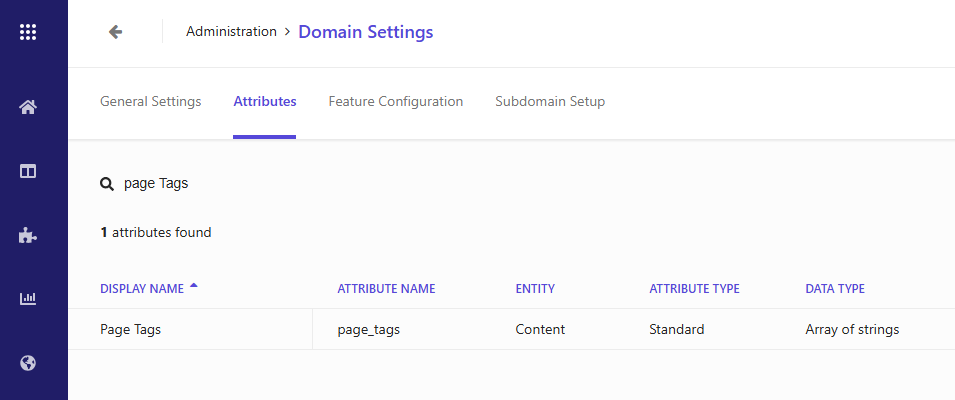
Step 2 — Open the attribute editor
Click page_tags in the list to open the attribute editing dialog.
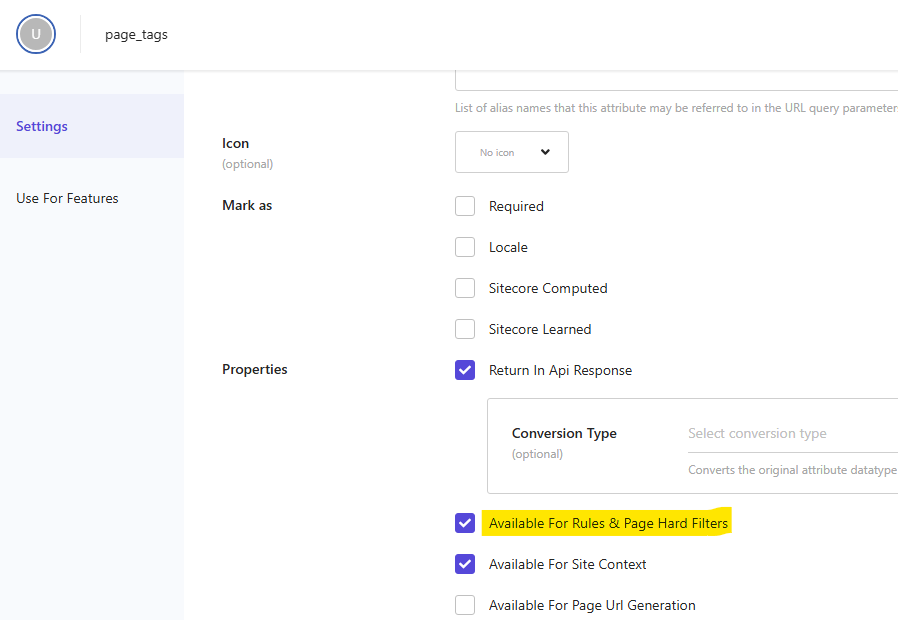
Step 3 — Turn on the required properties
On the Settings tab, scroll to the Properties section. These are the three flags that matter for hard filter use:
| Property | What it does | Why you need it |
|---|---|---|
| Return in API response | Includes the attribute value in search result payloads | Without this, page_tags values won't come back in results |
| Available for rules and page hard filters | Makes the attribute show up in the hard filter picker on pages | This is the critical one — without it, page_tags won't appear as an option when setting up the filter |
| Build enumeration of unique values | Pre-populates a dropdown of known values (e.g. Brisbane, Sydney) | Saves you typing raw values when configuring filters — you can just pick from a list |
Make sure all three are checked.
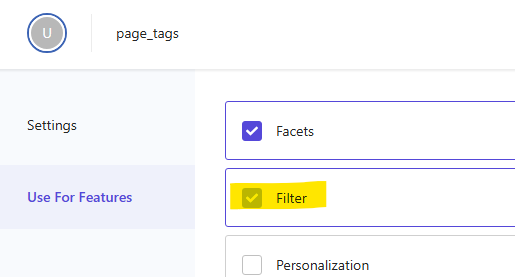
Step 4 — Enable Filters under Use For Features
Still in the same attribute editor, click the Use For Features tab. Select Filters.
This registers page_tags with Search's filtering engine. Without this, the attribute can hold values but can't be used to narrow results.
Step 5 — Save and Publish
Click Save, then Publish. Confirm when prompted.
Heads up: If this is the first time you're enabling filtering on
page_tags, tick Reindex all sources after publishing domain settings before confirming. This ensures existing indexed documents get the updated attribute treatment. For large indexes this can take some time — plan accordingly.
Part 2: Creating the Page with a Hard Filter
Who does this: This can be done by a developer, a Sitecore Search administrator, or a confident author — the CEC interface for this is straightforward once the attribute is ready.
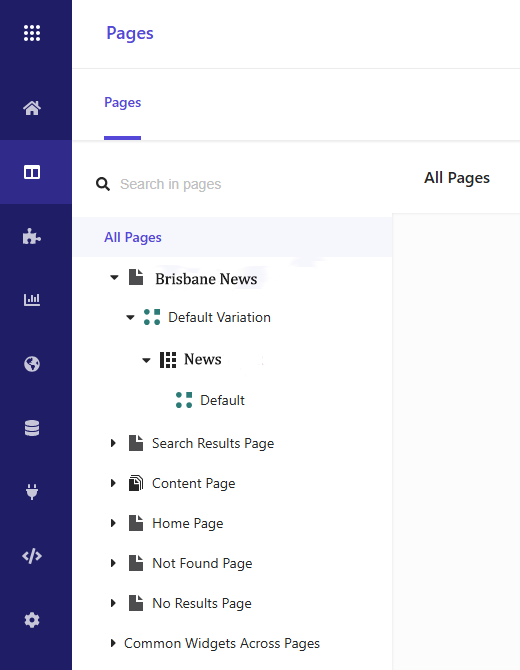
Step 1 — Go to Pages
In the CEC menu bar, click Pages.
Step 2 — Create a new Landing Page
Click Create Page → Landing Page.
Why Landing Page? Landing pages in Sitecore Search are purpose-built for experiences like this — a specific URL with a fixed content scope. They pair naturally with a search results widget and hard filter.
Step 3 — Name the page
On the Setup Page tab:
- Page Name:
Brisbane News— this is the internal label you'll see in the CEC, so make it descriptive - Page Variation Name:
Default
Click Next.
Step 4 — Set the URL
On the URL tab, enter:
- PAGE URL:
/news
This is the exact URL path on your website. When a visitor hits /news, Search will recognise it, load this page configuration, and apply the hard filter automatically.
If your site serves the same content on more than one URL (e.g. /news and /news/brisbane), click Add URL to include both.
Click Next.
Step 5 — Set the Hard Filter
This is the core of the setup. On the Hard Filters tab:
- Click Add Filter.
- From the Attribute dropdown, select
page_tags.If
page_tagsdoesn't appear here, go back to Part 1 and make sure Available for rules and page hard filters is enabled on the attribute. - Set the Operator to Is (or Equals depending on your CEC version).
- In the Value field, select or type
Brisbane.If you enabled Build enumeration of unique values, you'll see a list of known values to pick from. Otherwise, type the value exactly as it appears in your indexed content.
Click Next.
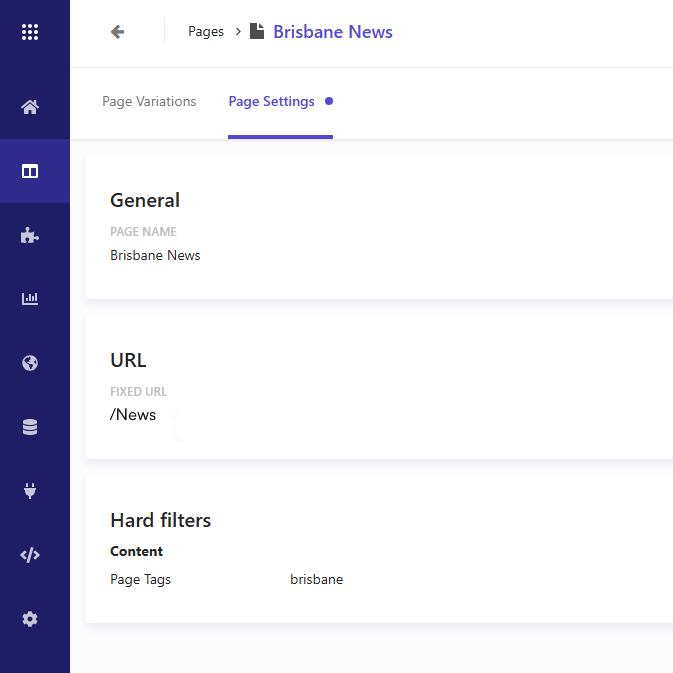
Step 6 — Review and Save
On the Review tab, check that everything looks right:
- URL:
/news - Hard Filter:
page_tags = Brisbane
Click Save.
Important — the page is empty until you add a widget. You've created the page configuration, but Search won't serve results until at least one widget is attached. Publishing now won't break anything, but visitors won't see a search experience. Continue to Part 3 before publishing.
Part 3: Creating and Attaching the Search Results Widget
Who does this: Typically a developer creates the widget the first time (since the RFK ID needs to match what's in the front-end code). Subsequent pages using the same widget can be managed by authors.
Step 1 — Create the widget
In the CEC menu bar, click Widgets → Add Widget → Search Results.
Fill in the setup screen:
| Field | Value | Notes |
|---|---|---|
| Widget Name | Brisbane News Search Results | Internal label — make it meaningful |
| RFK ID | rfkid_brisbane_news | This is the ID your front-end code uses to load the widget. Agree this with your developer before saving — it can't be changed easily later |
| Variation Name | Default | The starting variation |
| Will be used in | Landing Page | Matches the page type you created |
Click Next, review the summary, then Save. Then click Publish on the widget.
Step 2 — Attach the widget to the page
Go back to Pages and open Brisbane News.
On the Page Components tab, click Select Widgets. In the right-hand pane, find Brisbane News Search Results and drag it across to the left pane.
Click Save, then Publish the page.
The page is now live. Sitecore Search will serve Brisbane-only results to any widget on this page.
Step 3 — Front-end integration
This step is for developers. Authors can skip this section.
In your front-end application, reference the widget on the /news route using the RFK ID you set in Step 1. The Sitecore Search SDK sends the current page URL as context with every request — the Search service matches it to the Brisbane News page configuration and applies the hard filter automatically.
// React example using the Sitecore Search JS SDK
import { SearchResultsWidget } from '@sitecore-search/react'

export default function NewsPage() {
  return <SearchResultsWidget rfkId="rfkid_brisbane_news" />
}
You don't pass the filter in code. The SDK picks up the URL context (/news), the Search service looks up the matching page config, finds page_tags = Brisbane, and applies it before building the response. The filter is entirely owned by the CEC configuration — change it there and it takes effect immediately without a code deploy.
Summary, Other Use Cases, and Benefits
What you've built
The /news page now has a permanent, server-enforced content boundary. Every visitor — whether they search, browse, or use facets — will only ever see articles tagged Brisbane. Three distinct layers made this work:
- Attribute setup —
page_tagsenabled for filtering and hard filter use (developer/admin task, done once) - Page configuration —
/newsURL bound to thepage_tags = Brisbanehard filter (CEC, manageable by authors) - Widget association — a Search Results widget attached to deliver the experience (CEC + front-end code for the initial hookup)
Other use cases
The same pattern applies anywhere you need a fixed content scope per URL. The attribute setup is the same — only the page URL, filter attribute, and value change:
| Page URL | Hard Filter | Use case |
|---|---|---|
/news/sydney | page_tags = Sydney | City-specific news hub |
/blog/technology | content_type = Technology | Category blog listing |
/resources/whitepapers | document_type = Whitepaper | Filtered resource library |
/en-au/products | locale = en-AU | Region-specific product catalogue |
Because the same widget can be reused across pages, adding a new city or category is just a matter of creating a new page in the CEC with the right hard filter — no code change, no deployment.
Benefits
Zero front-end filter logic The filter lives in the CEC, not in code. Developers don't need to inject filter parameters per page or per route — the URL context does the work.
Visitors can't break out of scope Unlike URL query parameters or front-end filters, a hard filter has no client-side representation. There's nothing for a visitor to remove, modify, or work around.
Facets stay accurate Facet counts are calculated after the hard filter is applied, so if you're showing filters for date range or article category on the /news page, those counts reflect Brisbane content only — not the full index.
One widget, many pages A single widget configuration can power a dozen location-specific pages. Each page applies its own hard filter, keeping your widget library lean.
Authors can manage it Once the attribute is set up by a developer, creating additional scoped pages is a CEC task that authors and content managers can own themselves — no technical involvement needed.
Clean analytics per scope Each scoped page has its own URL, so Sitecore Search's analytics give you search behaviour, click-through rates, and zero-result queries broken down by location or category — right out of the box.
Sitecore Search documentation: Attributes · Add pages and widgets · Understanding filters and facets